
How to hang your hammock
Keep scrolling to learn everything you need to know about hanging your hammock.
1 | The right place for your hammock
Before setting up your hammock, we recommend first finding a suitable location for your hammock. We recommend a quiet space where you feel comfortable relaxing and has the required minimum space for your hammock. Depending on whether you are looking to relax in the yard, garden, patio, out on the balcony, or indoors, there are also a few things to consider. Keep scrolling for a brief overview of the most popular locations for hammocks and what to keep in mind for each option.

Hanging your hammock outdoors in your yard or garden
Hanging your hammock in the yard or garden is an excellent choice for those who want to enjoy the outdoor season to the fullest.
When choosing a suitable location, one of the relevant factors is whether you prefer to catch the sun or relax in the shade. As the seasons change, so will the amount of sun and shade your hammock‘s location will get.

If you don't want to choose between sun and shade, we recommend setting up your hammock with a hammock stand, which can easily be moved as needed.
If a hammock stand is not for you, you can hang your hammock between trees, posts, poles, walls, or ceilings. You can also combine hanging options, for example between a tree and post, or wall and ceiling. Always make sure that where you are hanging your hammock from is load-bearing before you attach the hammock - if you are unsure, please consult a professional.
Hanging a hammock on your terrace
If you want to hang your hammock on the terrace, you also have several alternatives to choose from: For example, a sturdy canopy, an exterior wall, a post or a beam - just be sure they are load bearing.

If a load bearing option is not available you can still setup your hammock out on your terrace with a hammock stand. This option is more flexible, since you can move your hammock stand around as needed.
Hanging a hammock on your balcony
Before you hang a hammock on your balcony, you should first check if you have the minimum required space. It is best to try placing your existing furniture, such as garden table and chairs, in the desired location to estimate how much space you have for your hammock. If space is tight, consider hanging your hammock across the corner of your balcony.

You can hang your hammock from your balcony ceiling or beams, house wall, or railing – as long as they are load bearing and meet the minimum height requirements (see chapter 2). When mounting from a house wall, we recommend that you check with your landlord in advance before breaking out the drill.

If you don’t have any load bearing options available, you can check out our hammock stand options. We recommend our Nautico hammock stand, which is space-saving and easy to assemble.
Tip:
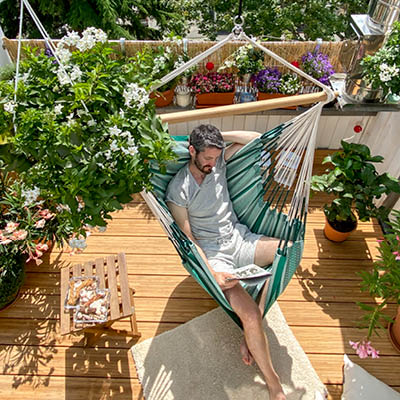
If you are looking for that hammock feel but are tight on balcony space, consider a hammock chair. Hammock chairs take up less space than hammocks and only require one hanging point, making them a great choice for small balconies and spaces.
Hanging your hammock indoors
While the hammock is often considered a garden or outdoor product, in South America it can be found in almost every home. And not without good reason – an indoor hammock provides calm and comfort between your own four walls regardless of wind or weather outside.

Before you begin installing your hammock, you may want to consider whether your hammock will be used as a personal retreat, or for spending time with loved ones. Depending on your preference, you may decide to hang it in a more quiet or lively location within your living space.
If indoor hammocking is for you, once you have decided on a room we recommend checking whether you have the right surfaces to hang your hammock from: You can use walls and ceilings for suspension, provided they are made of solid masonry or drywall with a wooden substructure (studs). Load-bearing beams can also be used.
2 | How much space does a hammock need?
To determine the space required for hanging your hammock, there is no universal rule. The type of hammock, its size, and your chosen hammocking location determines how much space you will need.
Calculating space for your hammock
Space requirements for a classic hammock (without a spreader bar)
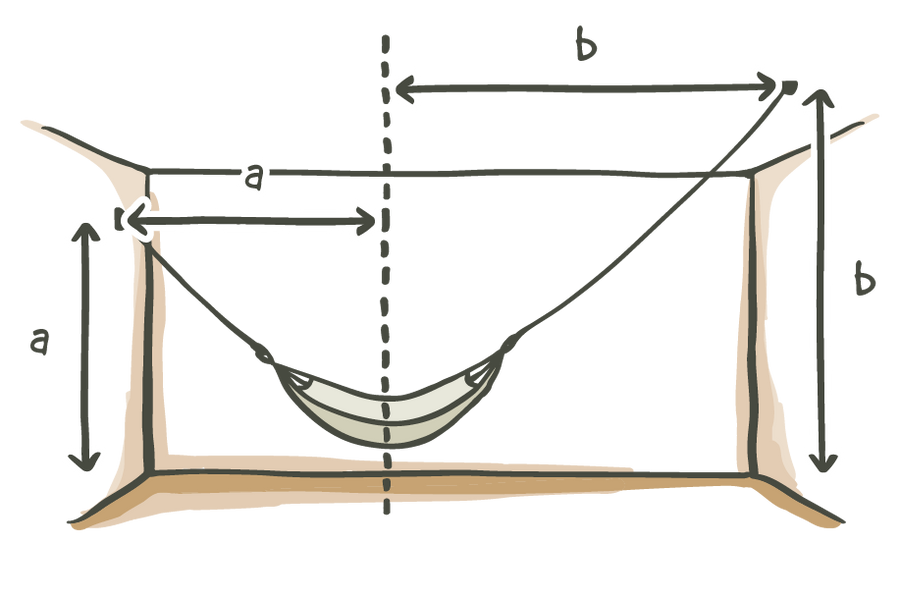
The two measurements to consider for hanging a hammock are the required hanging distance and the required hanging height.

The recommended minimum hanging distance for your classic hammock will be 90% of it’s total length (total length – 10%).
For example: If your hammock is three meters long, the minimum required distance is 270 cm.
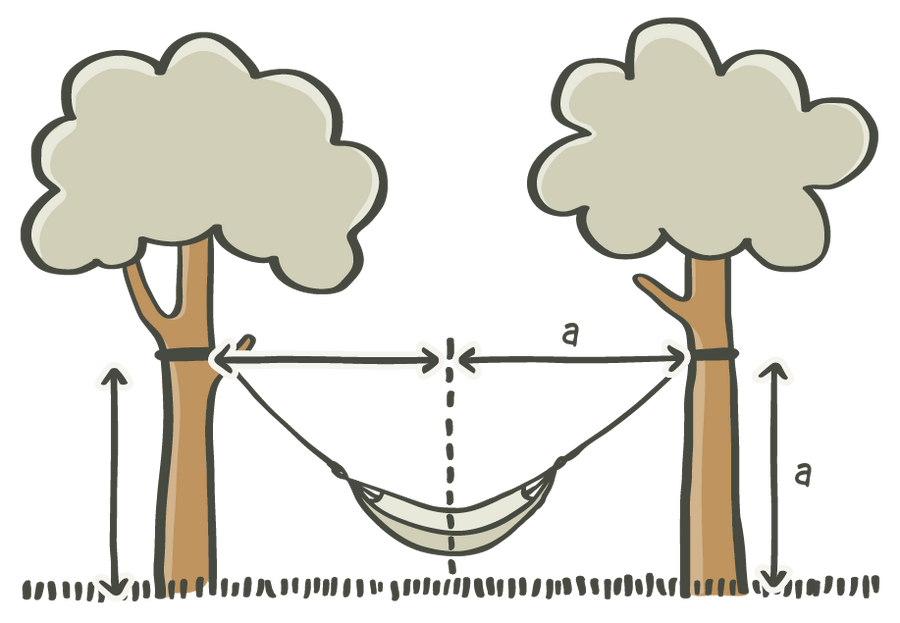
To meet the minimum required suspension height for a classic hammock, the distance from the center of the hammock to the tree should be the same as the distance from the ground to the
For example, if your hammock is centered and there are four meters distance (length) between the suspension points, the suspension points should be at a minimum height of two meters.
Minimum distance and minimum height for the hammocks Brisa, Modesta, Flora and Bossanova:
| Size | Minimum Distance | Minimum Height |
|---|---|---|
| Basic | 270 cm | 135 cm |
| Double | 310 cm | 155 cm |
| Kingsize | 360 cm | 180 cm |

If your mounting locations are different heights and have more than the minimum required distance, you can mount your hammock higher on one side. We still recommend that there should be about the same distance between the center of your hammock and the fastening element as there is between the ground and the suspension point.
Space requirements for a hammock with spreader bar

To meet the minimum recommended hanging distance needed for a spreader bar hammock, the recommended minimum distance between the suspension points should be the same as the length of the hammock.
For example, if your spreader bar hammock is three meters long, there should be three meters between the suspension points.

Compared to a classic hammock style, a spreader bar hammock needs more tension. Depending on the product, the minimum recommended hanging height should be about one third (for Alisio) or one quarter (for Alabama) of the hanging distance.
For spreader bar hammocks: If the suspension points are at different heights and are further apart than the minimums described, your hammock can be attached higher on one or the other side - only the recommended ratio of suspension distance and length is important.
Good to know
Please note the recommended minimums given are guidelines. Suspension distance and height can differ slightly from the recommended minimums without affecting the comfort of your hammock.

3 | Setting up your hammock
Once you are sure you have the space and load bearing locations for your hammock, you can move on to installation. We offer different suspension options depending on how you want to hang your hammock:
Hanging a hammock between trees

Setting up your hammock is quick and easy with the TreeMount suspension set. The TreeMount suspension set contains:
• 2x tree-friendly harnesses
• 2x resistance ropes
• 2x SmartHooks for adjusting the rope length
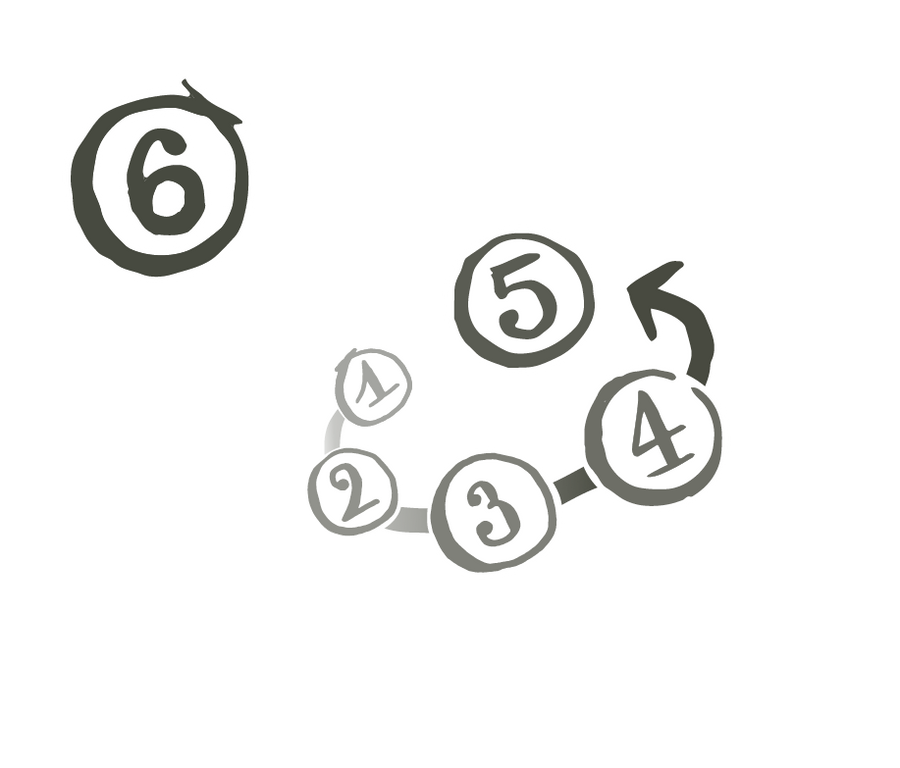
Suspension with the set is done in 6 simple steps:
-
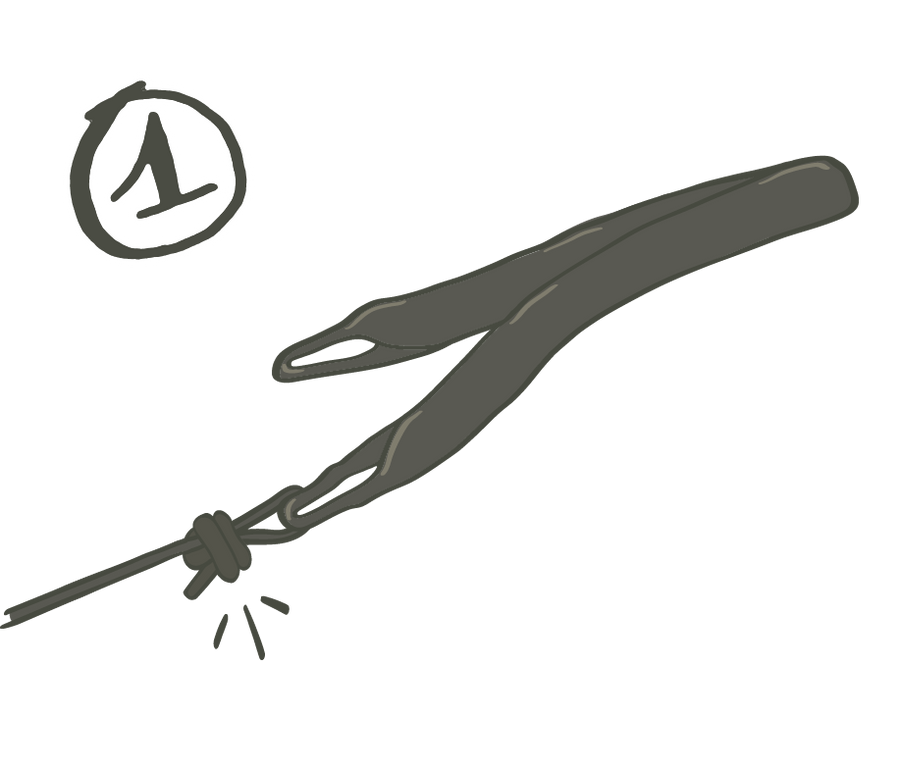
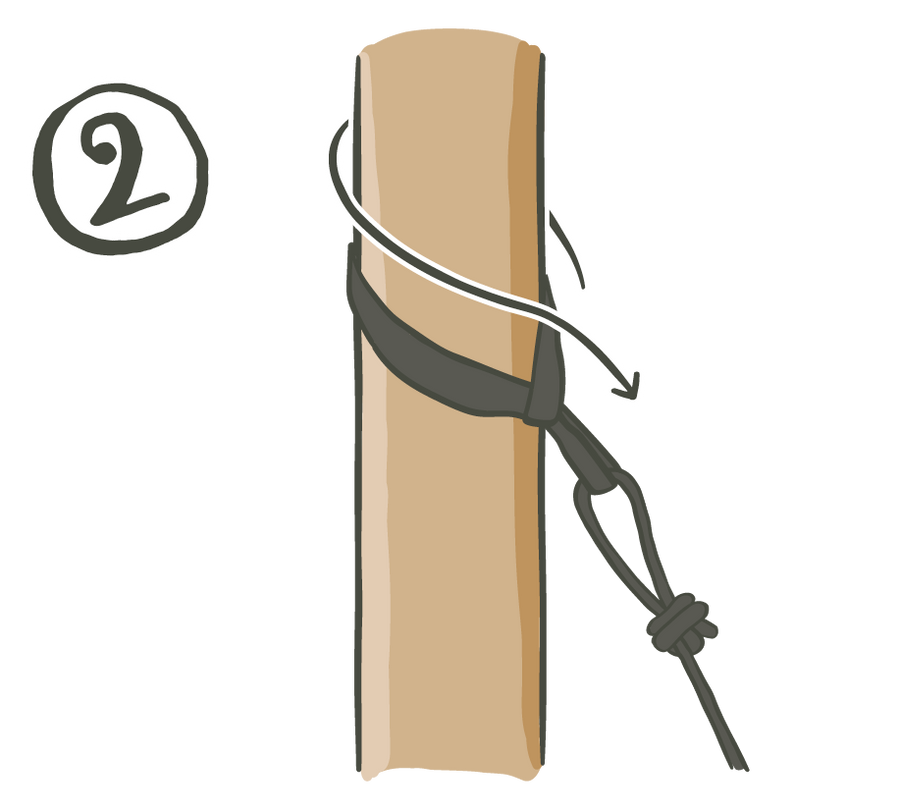
You will need to start with one tree-friendly harness and one resistance rope. Tie the rope to one end loop of the tree-friendly harness.
-

Wrap the harness around the tree trunk or branch, and then feed the tied rope through the open loop on the otherside of the harness. Depending on the width of the trunk, the harness can also be wrapped several times around the tree trunk/branch as needed.
-
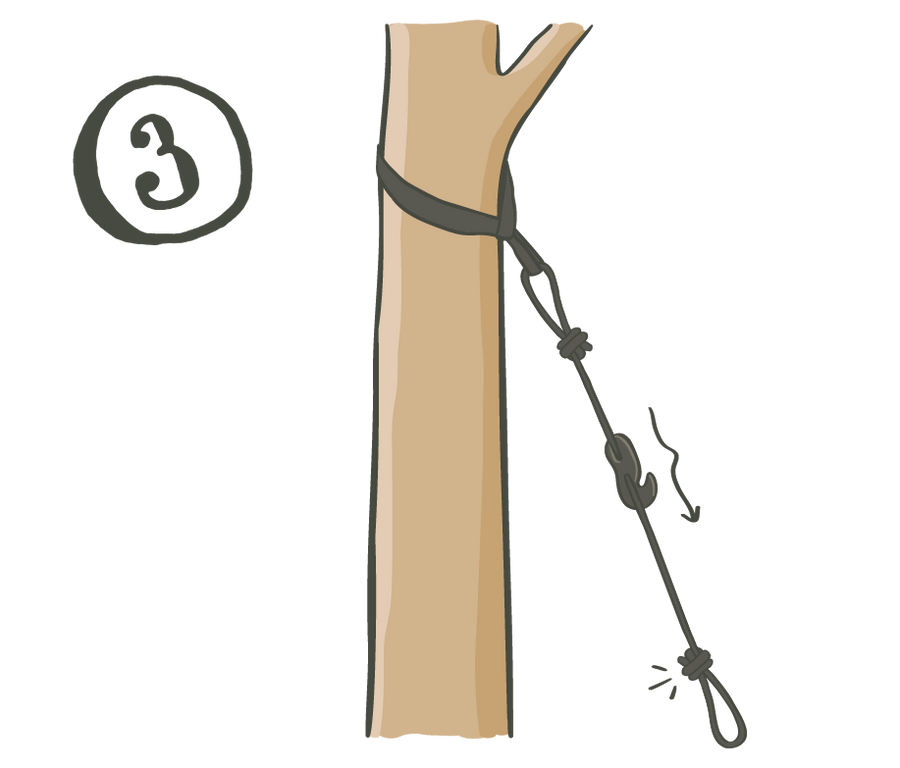
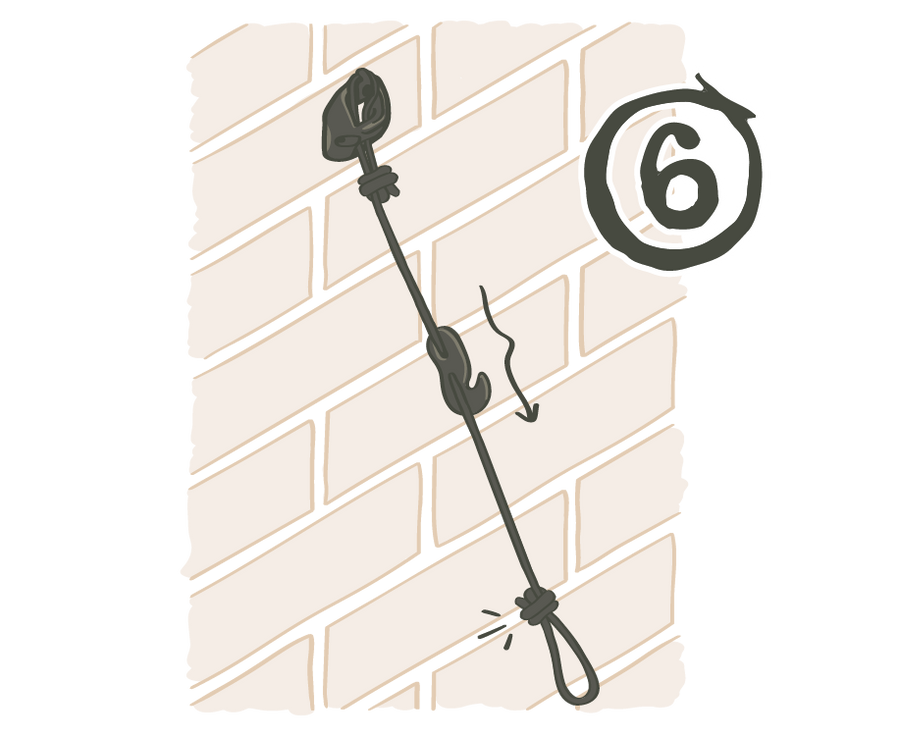
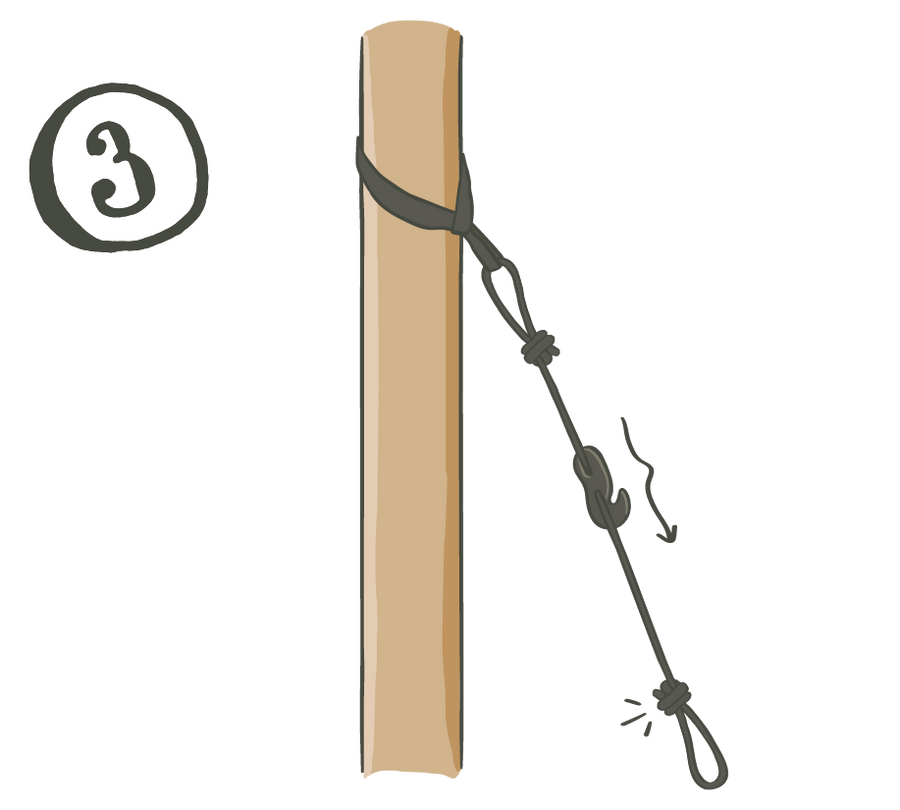
Now thread the rope through the openings of the SmartHook and knot another loop at the end of the rope.
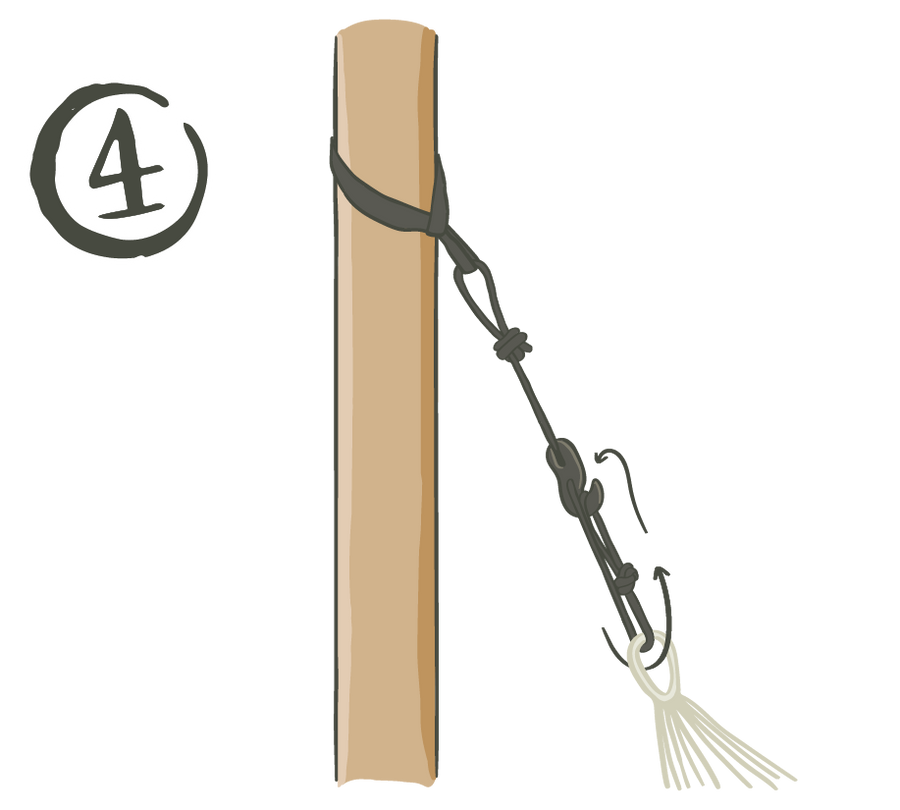
-
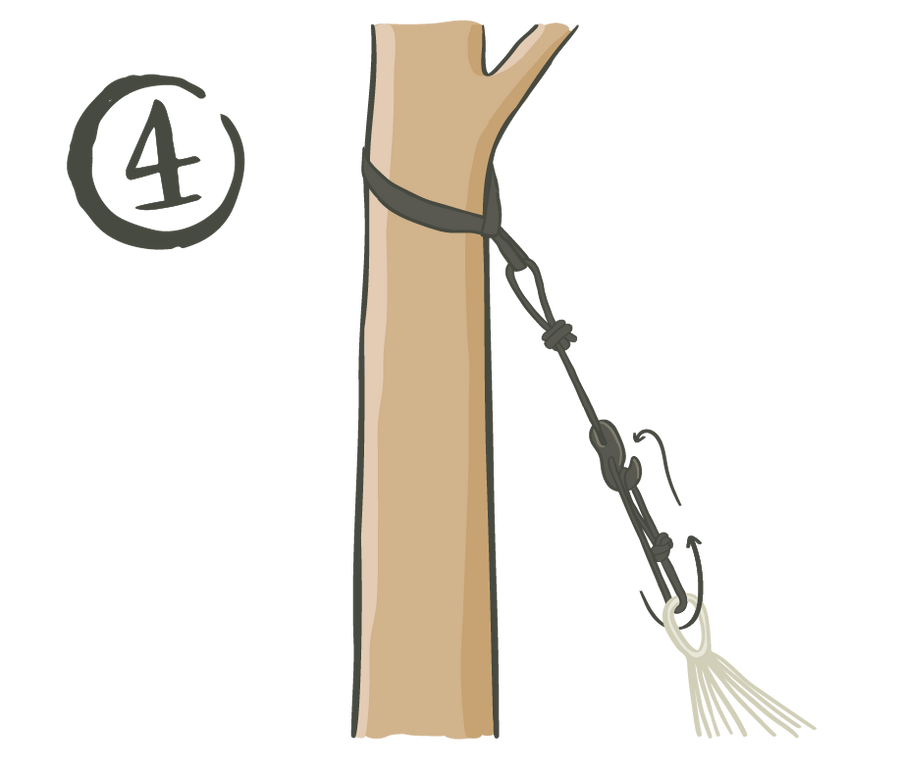
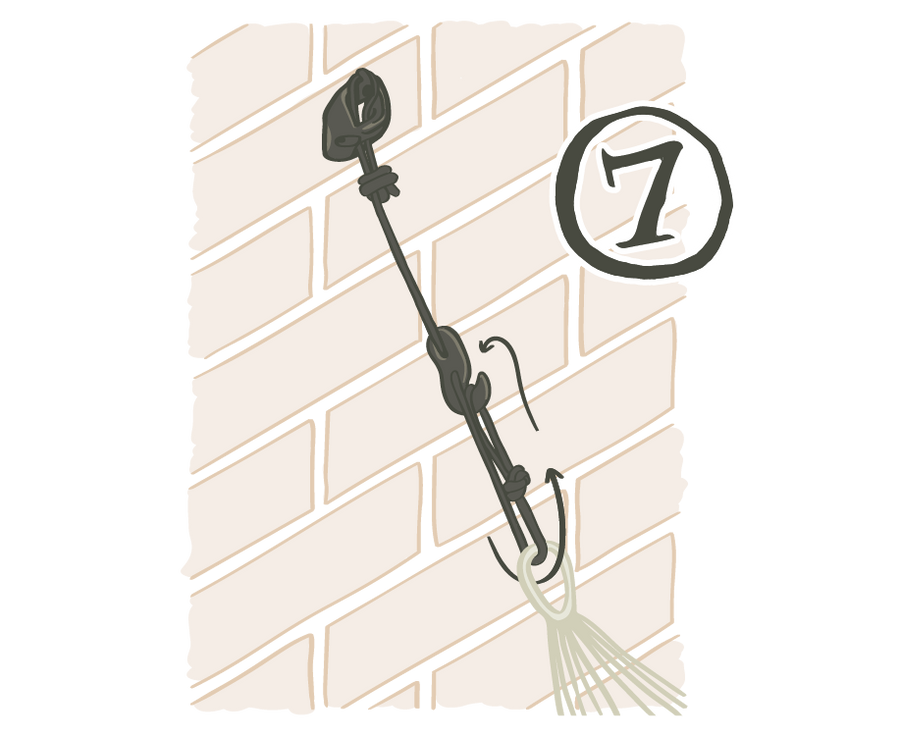
Pull the looped rope end through the hammock suspension loop (end of your hammock) and hook the looped end rope onto the SmartHook.
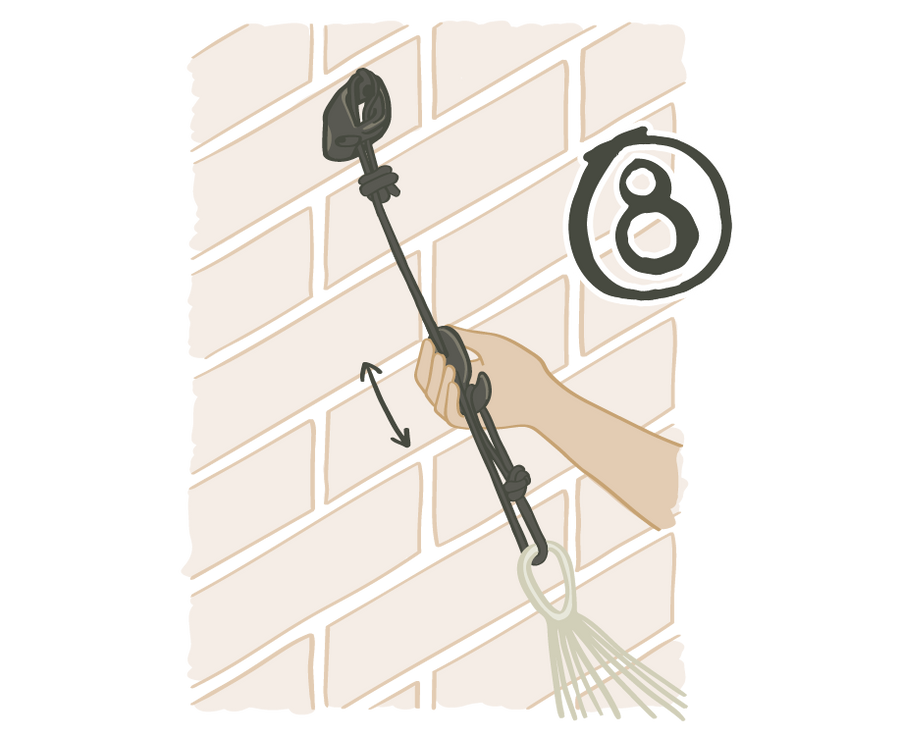
-

Our hammock should now be hooked into the TreeMount. The height/tension of the hammock can be adjusted by sliding the SmartHook up or down the rope.
-
Repeat all steps on the other side.
-
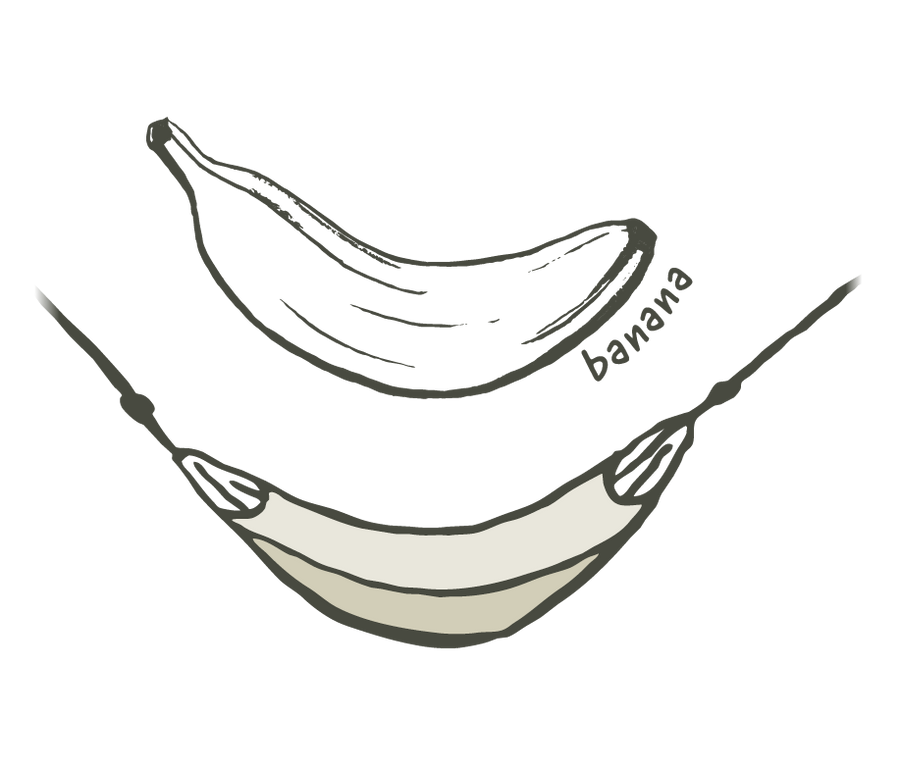
Once your hammock is setup, the shape of your classic hammock without a spreader bar will resemble a banana. It will hang with slack and will not have too much tension.
A spreader bar hammock should hang tighter than a classic hammock.


How to hang a hammock between 2 trees
In our LA SIESTA Lab you can take another look at how-to step-by-step.
Mounting your hammock on a wall or ceiling

The CasaMount mounting set is ideal for wall or ceiling mounting for your hammock.
It contains:
• 2x MultiSpot wall or ceiling hooks
• 4x screws
• 4x dowels (anchors)
• 2x resistance ropes
• 2x SmartHooks
• 1x Manual with paper template
To attach the hammock with the set, simply follow the steps below:
-
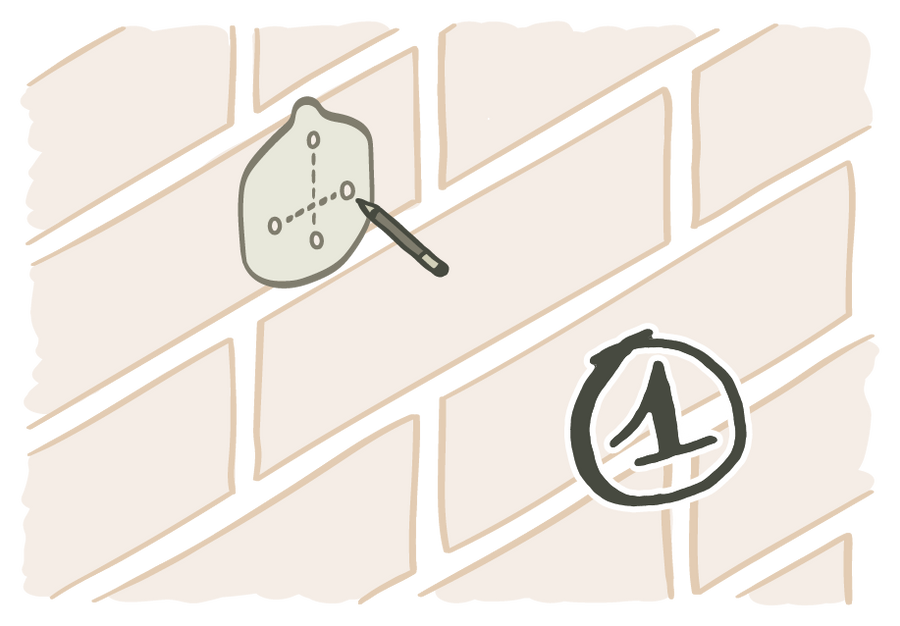
Use the included template to mark 4 drill holes on the ceiling or wall. This will mark where your MultiSpot goes.
-
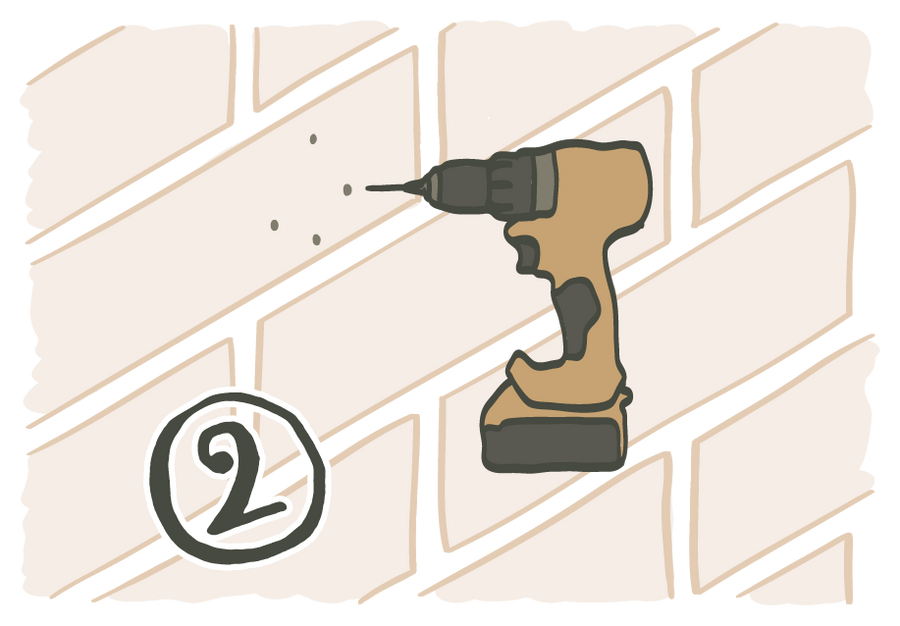
Drill the holes at the marked drill hole locations using an 8 mm drill bit.
-
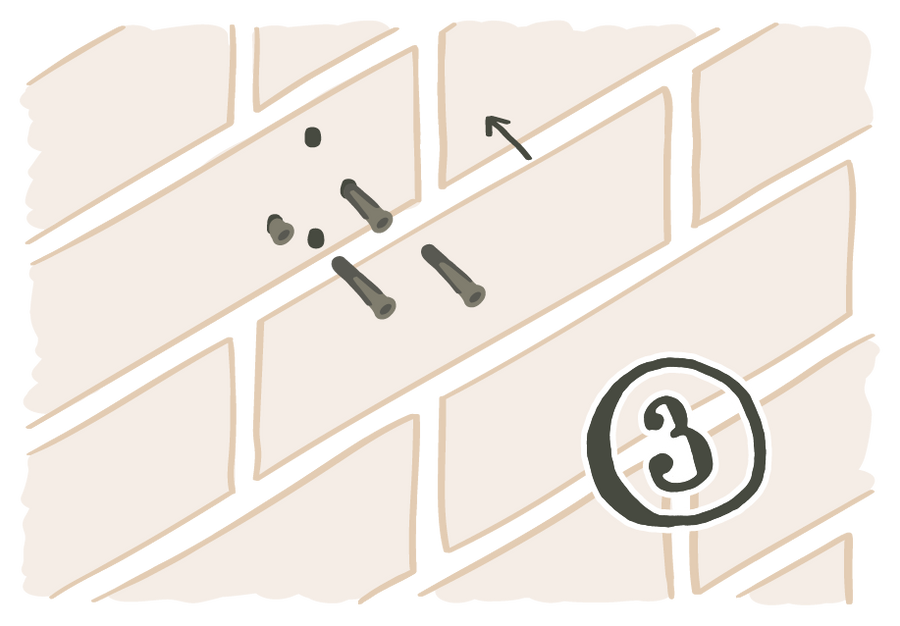
If you are attaching the Multispot to a ceiling made of solid masonry, insert the included dowels (anchors) in the drilled holes. These should be flush with the ceiling surface. If you have drywall or wooden beams, this step is not necessary.
-
In the next step, attach the MultiSpot to the ceiling or beam using the 4 provided screws. Be sure your MultiSpot does not pull away from the ceiling and is securely fastened.
-
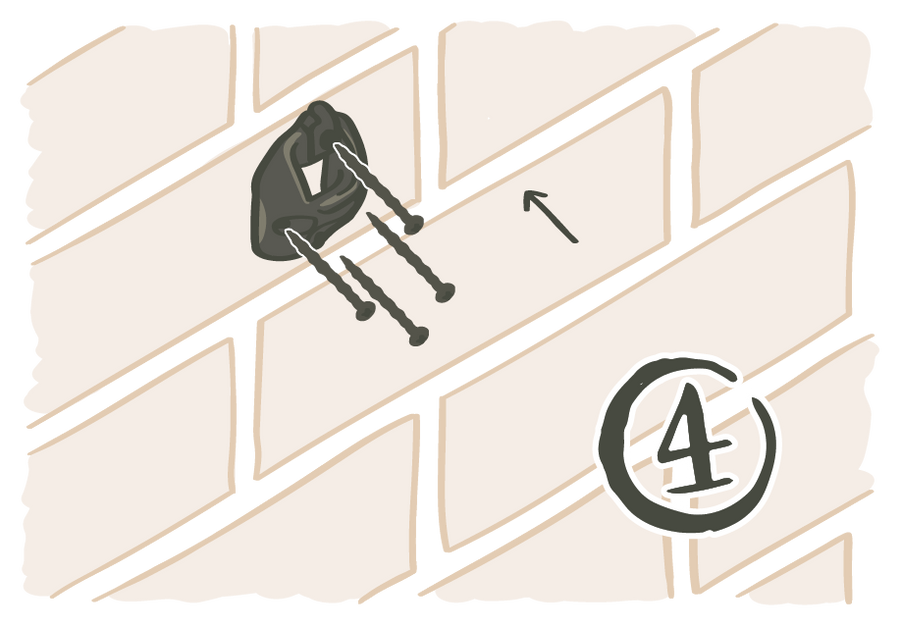
The included ropes are tied as a loop on one end and hooked into the MultiSpot.
-
The SmartHook is threaded through the other rope end, and a final loop is tied at the open end of the rope.
-
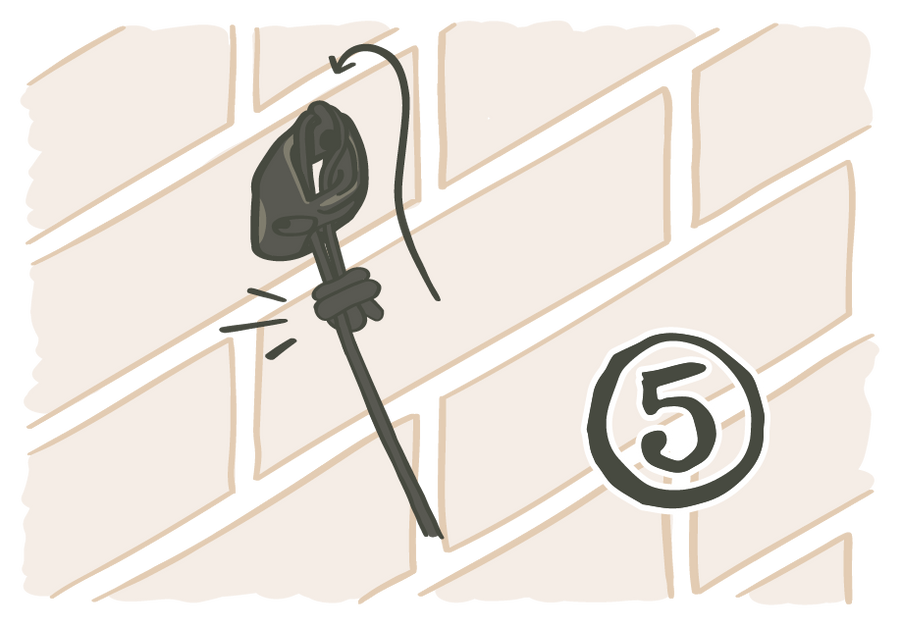
Thread the looped rope end through the hammock suspension loop (end of your hammock) and hook the looped end rope onto the SmartHook.
-
Adjust the hanging height as needed by moving the SmartHook up or down.
Repeat all steps on the other side. -
Once your hammock is setup, the shape of your classic hammock without a spreader bar will resemble a banana. It will hang with slack and will not have too much tension.
A spreader bar hammock should hang tighter than a classic hammock.


-
Good to know
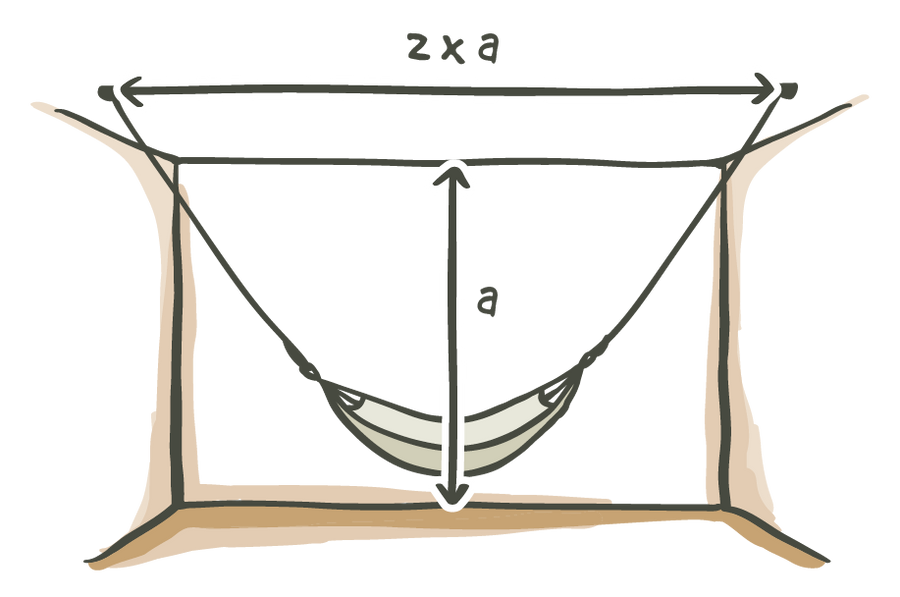
If you want to place your hammock in the middle of a large room or if the space between your walls doesn‘t meet the minimum recommended distance, we recommend suspending your hammock from the ceiling. In this case, the ideal distance between the two ceiling hooks is the ceiling height times two.
-
Instead of suspending your hammock from the same kind of surface you can combine options, for example suspending your hammock from the wall and ceiling. To determine the hanging distance for this, both the ceiling height and the height of the wall hooks must be taken into account.


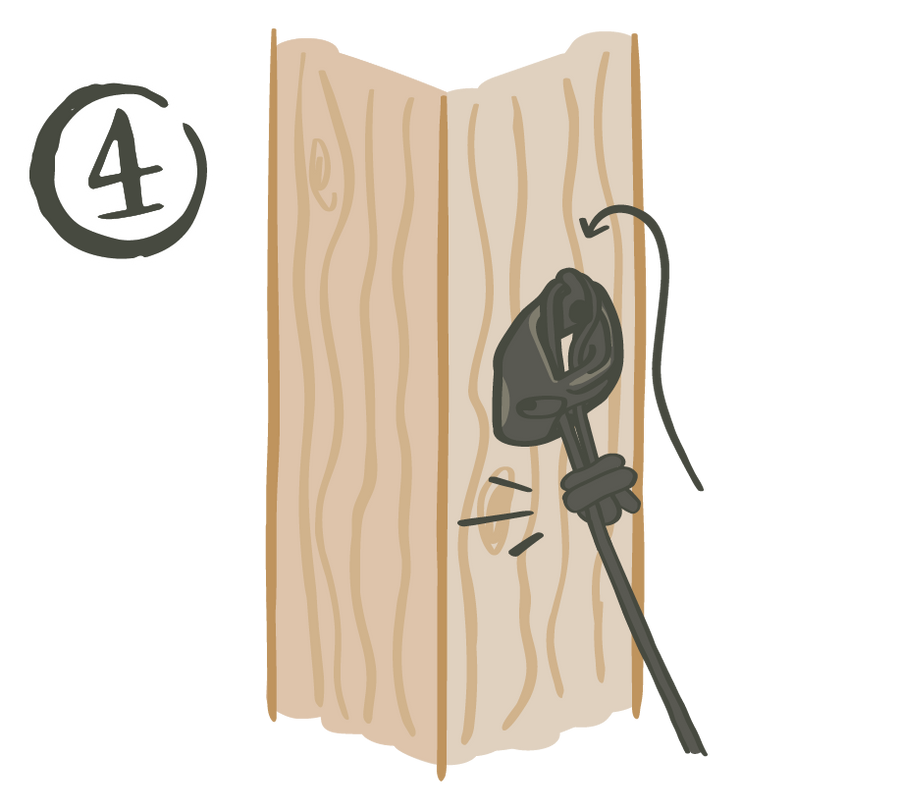
Mounting on angular beams or posts
On angular wooden beams and posts, the suspension works analogously to the installation on the wall or ceiling:
-
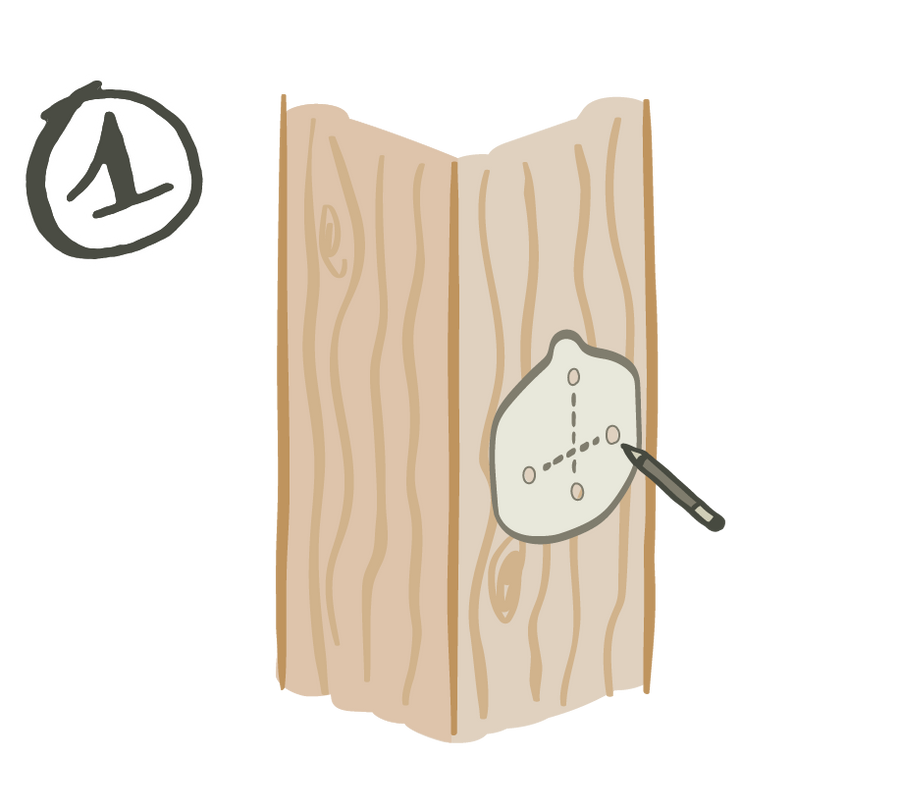
Using the template included in the set, mark the 4 required drill holes on the beam or post.
-
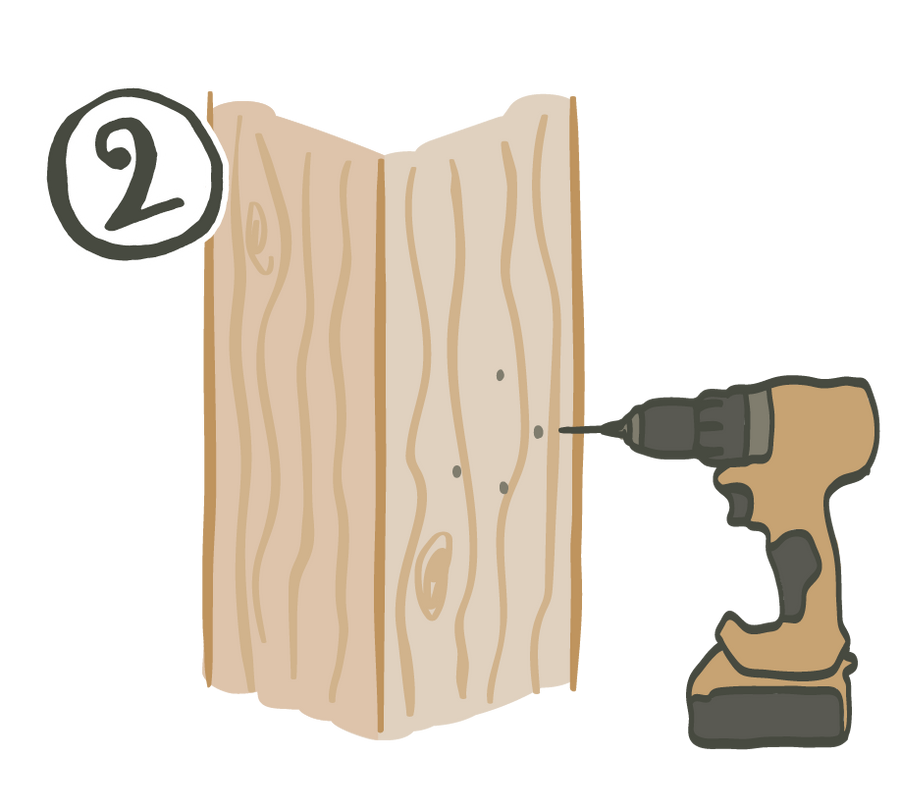
Drill the holes in the pre-drawn places with a 2-3 mm wood drill.
-
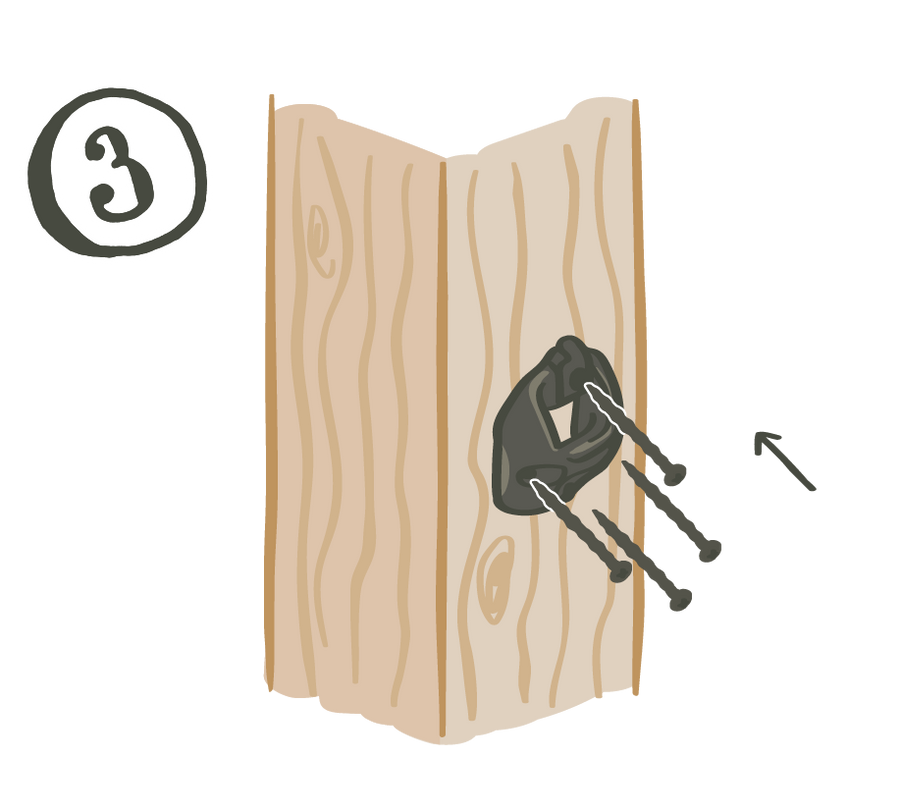
Now screw the MultiSpot to the beam or post.
-
Knot the end of the rope into a loop and hook it into the MultiSpot hook.
-
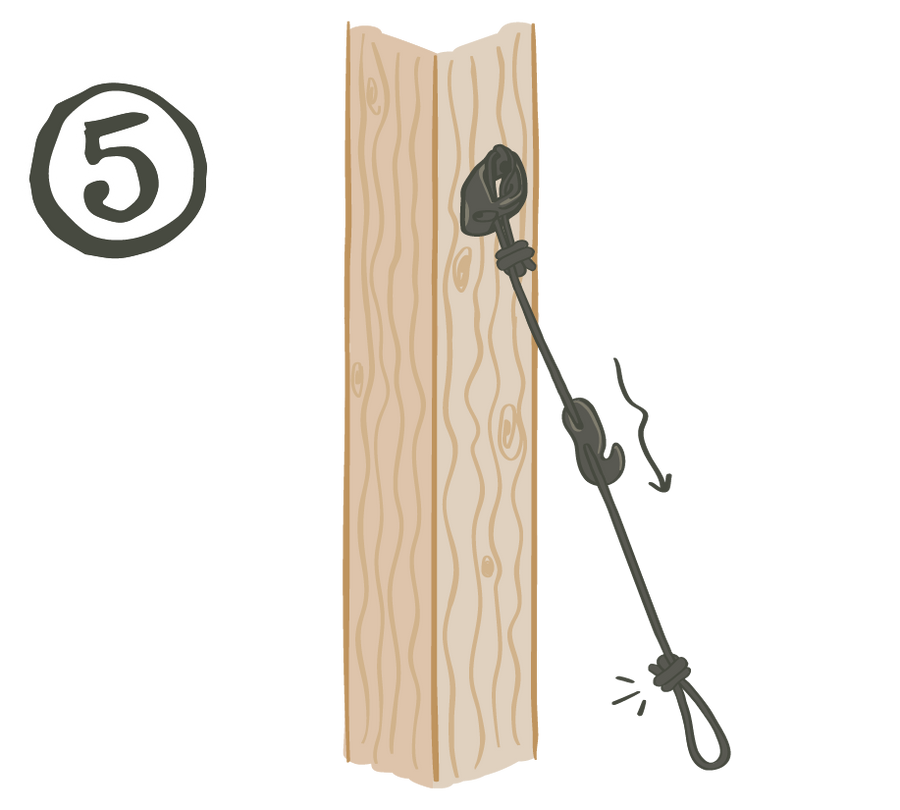
Feed the ropes through the SmartHook and form the other end of the rope into a loop.
-
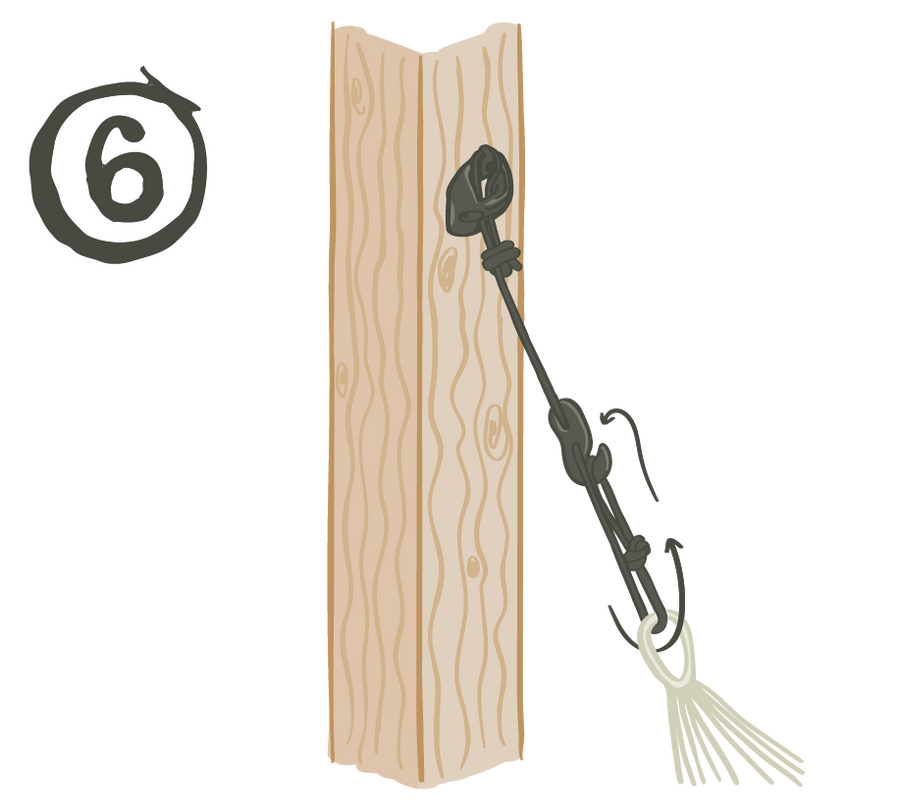
Feed it through the hanger on the hammock and connect it to the SmartHook by hooking it.
-
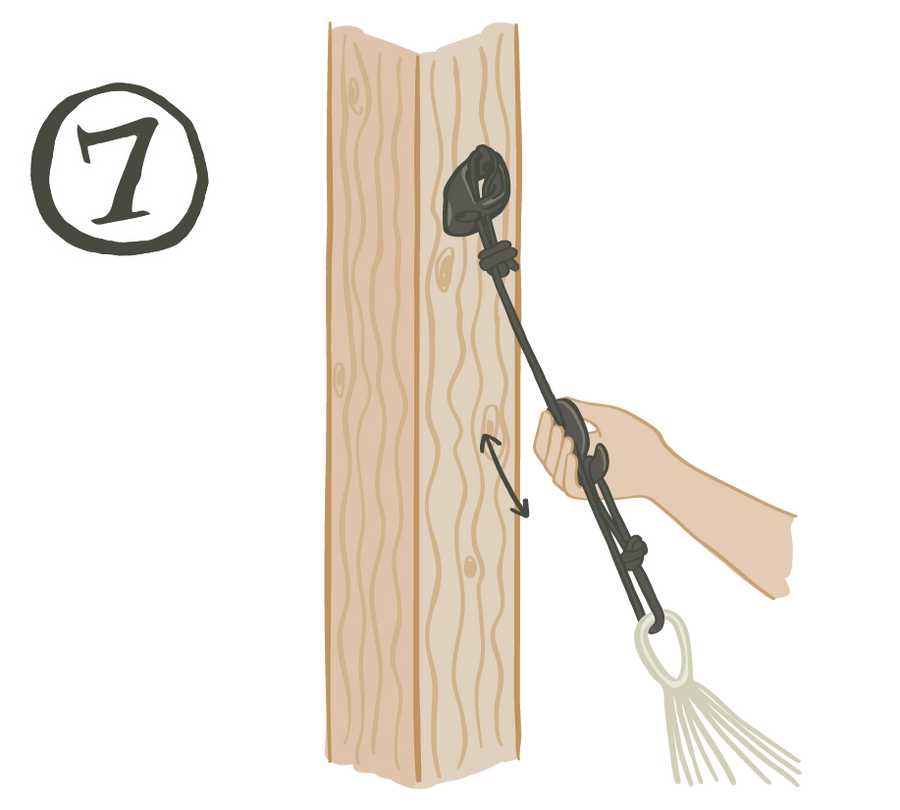
Adjust the ideal hanging height by moving the SmartHook up or down.
Repeat all steps on the second suspension point. -
Once your hammock is setup, the shape of your classic hammock without a spreader bar will resemble a banana. It will hang with slack and will not have too much tension.
A spreader bar hammock should hang tighter than a classic hammock.


Mounting on round beams or posts
Installation on round beams and posts made of wood, metal or cement is done with the TreeMount suspension set in the same way as suspension between two trees:
-
Connect the rope to the harness via a loop.
-
Loop the harness around the beam or post and pull the end through the other opening of the harness. If the beam or post is narrow, you can wrap the strap around several times.
-
Feed the rope through the openings of the SmartHook and tie another loop at the end of the rope.
-
Feed the end of the rope through the hammock and hook it into the SmartHook.
-

Slide the SmartHook up or down to decrease or increase the distance between the ground and the hammock.
Repeat all steps on the second suspension point. -
Once your hammock is setup, the shape of your classic hammock without a spreader bar will resemble a banana. It will hang with slack and will not have too much tension.
A spreader bar hammock should hang tighter than a classic hammock.


Hammock with stand
If you don't have a suitable installation location for setting up your hammock or you want to keep your relaxation locations flexible, we recommend a hammock stand option.
You can choose between a wooden frame or a frame made of powder-coated steel.

Wooden frames make your hammock look especially beautiful. Our Elipso made of FSC™-certified larch wood also allows quick and easy adjustments of the hanging height.
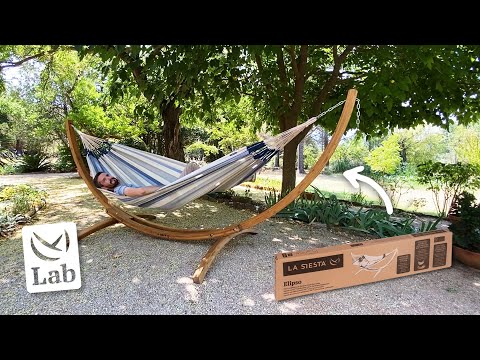
How to assemble the Elipso hammock stand – easy and fast
We'll show you how to assemble Elipso with minimal effort in the LA SIESTA Lab.

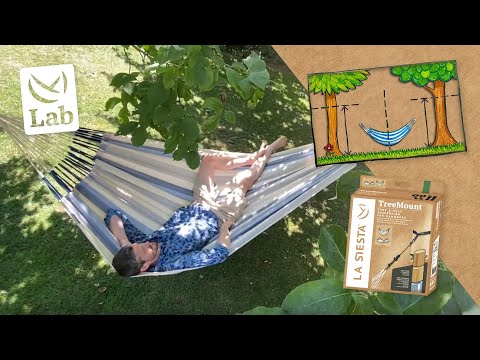
Metal frames are very easy to clean which makes them ideal for outdoor use. Our Nautico has a space saving advantage and which makes it suitable for small gardens, yards, or terraces. Nautico is also very easy to put together with the PlugTube system.
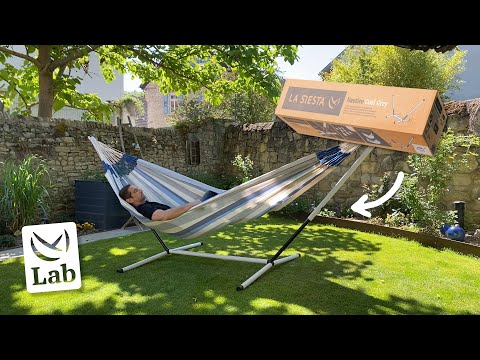
Relax in the garden with the stand for hammocks Nautico
We'll show you the easy assembly using the plug-in system in this LA SIESTA Lab.
4 | Enjoying your hammock
As you can see, hanging a hammock is a breeze. With our suspension sets and stands, you'll always have a safe installation option - whether you want to relax in the backyard, garden, on the balcony or indoors.
Further topics:
-
Hang your hammock chair
We explain step by step how to setup your hammock chair indoors or outdoors. -
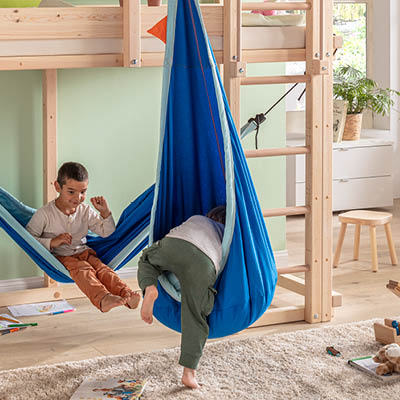
Hang your hanging nest
We'll explain how to attach a kids hanging nest quickly and easily. -

FAQ
Here you'll find the most frequently asked questions about hammocks, hanging chairs, payment, shipping and returns.


